Best Remote IoT Setup Behind Router Using Raspberry Pi for Free
Remote IoT projects are gaining immense popularity as technology evolves, and one of the most sought-after solutions is setting up a Raspberry Pi behind a router for free. This allows users to access their IoT devices remotely without incurring additional costs. Whether you're a hobbyist, a professional, or someone exploring the possibilities of IoT, this guide will help you achieve a seamless setup.
With the increasing demand for smart home automation and remote device management, having a reliable IoT setup is crucial. A Raspberry Pi can act as a powerful gateway for controlling and monitoring IoT devices. In this article, we will explore how to configure it behind a router and make it accessible from anywhere in the world without spending a dime.
This guide will provide step-by-step instructions, tips, and best practices to ensure you get the most out of your Raspberry Pi IoT setup. Whether you're a beginner or an experienced user, the content is designed to cater to all levels of expertise. Let's dive in!
Introduction to Remote IoT Setup
Remote IoT setups are becoming increasingly important in today's connected world. The ability to control and monitor devices from anywhere is not only convenient but also cost-effective. By using a Raspberry Pi behind your router, you can create a robust IoT infrastructure without the need for expensive cloud services.
Why Choose Raspberry Pi?
Raspberry Pi is a versatile and affordable single-board computer that can handle a variety of tasks, including running IoT applications. Its compatibility with various programming languages and operating systems makes it an ideal choice for remote IoT setups.
Some key advantages of using Raspberry Pi include:
- Low power consumption
- Extensive community support
- Compatibility with open-source software
What is Raspberry Pi and Why Use It?
Raspberry Pi is a small, credit-card-sized computer that has gained immense popularity among hobbyists, educators, and professionals. It is capable of performing a wide range of tasks, from basic computing to complex IoT projects. The latest models of Raspberry Pi come equipped with powerful processors, multiple USB ports, and built-in wireless connectivity.
Key Features of Raspberry Pi
- Quad-core processor
- 1GB RAM (or more, depending on the model)
- Support for multiple operating systems
- GPIO pins for hardware integration
When it comes to IoT projects, Raspberry Pi's ability to interface with various sensors and devices makes it an excellent choice. Additionally, its low cost and ease of use make it accessible to users of all skill levels.
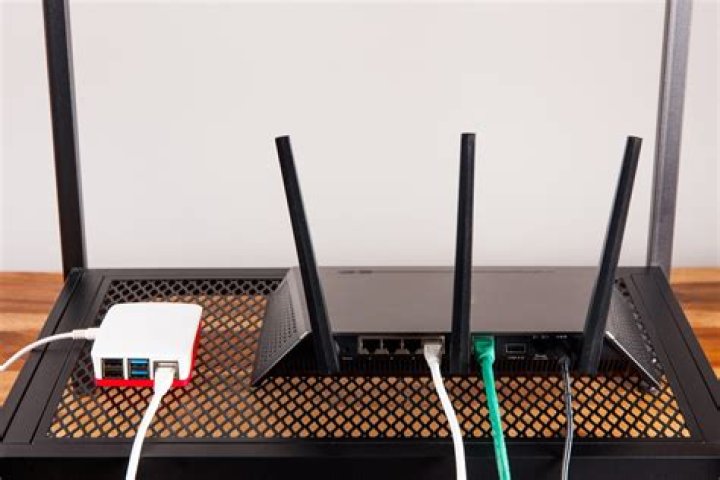
Setting Up Your Router for Remote Access
One of the critical steps in creating a remote IoT setup is configuring your router. A router acts as a gateway between your local network and the internet. By setting it up correctly, you can ensure that your Raspberry Pi is accessible from anywhere in the world.
Steps to Configure Your Router
Follow these steps to prepare your router for remote access:
- Log in to your router's admin panel using its IP address.
- Locate the settings for port forwarding or virtual servers.
- Set up rules to forward specific ports to your Raspberry Pi's local IP address.
It's essential to choose a static IP address for your Raspberry Pi to avoid issues when the device reboots. Most routers allow you to assign static IPs through their DHCP settings.
Understanding Port Forwarding
Port forwarding is a technique used to allow external devices to access services running on your local network. When setting up a Raspberry Pi for remote IoT, port forwarding ensures that incoming connections are directed to the correct device.
How Does Port Forwarding Work?
Port forwarding works by mapping specific ports on your router to the corresponding ports on your Raspberry Pi. For example, if your IoT application runs on port 8080, you would configure your router to forward incoming traffic on port 8080 to the Raspberry Pi's local IP address.
Some commonly used ports for IoT applications include:
- 80 (HTTP)
- 443 (HTTPS)
- 22 (SSH)
Always ensure that you use secure protocols and encryption when setting up port forwarding to protect your data from unauthorized access.
Software Requirements for IoT Projects
Choosing the right software is crucial for the success of your remote IoT setup. The Raspberry Pi supports a wide range of operating systems and applications, making it versatile for various use cases. Here are some essential software tools you may need:
Operating Systems
- Raspberry Pi OS (formerly Raspbian)
- Ubuntu Server for Raspberry Pi
Applications
- Node-RED for visual programming
- Mosquitto for MQTT communication
- Home Assistant for smart home automation
Installing and configuring these tools can enhance the functionality of your Raspberry Pi and improve its performance in IoT applications.
Configuring Remote Access
Once your router and Raspberry Pi are set up, the next step is to configure remote access. There are several methods to achieve this, including using SSH, VNC, or cloud-based services. However, since the goal is to keep costs low, we will focus on free solutions.
Using SSH for Remote Access
SSH (Secure Shell) is a secure protocol that allows you to remotely manage your Raspberry Pi from any device with an internet connection. To enable SSH on your Raspberry Pi:
- Install the SSH server on your Raspberry Pi.
- Enable SSH in the Raspberry Pi configuration settings.
- Use an SSH client (such as PuTTY or Terminal) to connect to your Raspberry Pi.
Make sure to use strong passwords and enable two-factor authentication for added security.
Security Measures for Remote IoT
Security should be a top priority when setting up a remote IoT system. Since your Raspberry Pi will be accessible over the internet, it's crucial to implement robust security measures to protect your data and devices.
Best Practices for Security
- Use strong, unique passwords for all accounts.
- Enable firewalls and intrusion detection systems.
- Regularly update your operating system and applications.
- Monitor logs for suspicious activity.
By following these practices, you can significantly reduce the risk of unauthorized access and potential cyberattacks.
Common Issues and Troubleshooting
Even with careful planning and setup, issues can arise when configuring a remote IoT system. Here are some common problems and their solutions:
Unable to Connect via SSH
- Check your router's port forwarding settings.
- Ensure SSH is enabled on your Raspberry Pi.
- Verify that your firewall is not blocking the connection.
Slow Performance
- Optimize your Raspberry Pi's configuration settings.
- Close unnecessary background processes.
- Use a wired connection instead of Wi-Fi for better stability.
Addressing these issues promptly can help ensure a smooth and reliable remote IoT setup.
Performance Optimization Tips
To get the most out of your Raspberry Pi IoT setup, consider the following performance optimization tips:
- Use a fast and reliable internet connection.
- Choose lightweight applications and services.
- Regularly clean up unnecessary files and data.
By following these tips, you can improve the overall efficiency and responsiveness of your IoT system.
Conclusion and Next Steps
In conclusion, setting up a remote IoT system behind a router using a Raspberry Pi for free is an excellent way to explore the possibilities of IoT without incurring additional costs. By following the steps outlined in this guide, you can create a robust and secure setup that meets your needs.
We encourage you to share your experience and provide feedback in the comments section below. Additionally, feel free to explore other articles on our site for more insights into IoT and Raspberry Pi projects.
Remember, the key to a successful IoT setup lies in continuous learning and experimentation. Happy tinkering!
Data Sources: